Nov 08 2022

Turn a Terraform Map of Maps into a Single Map…

Published by under DevOps,Terraform

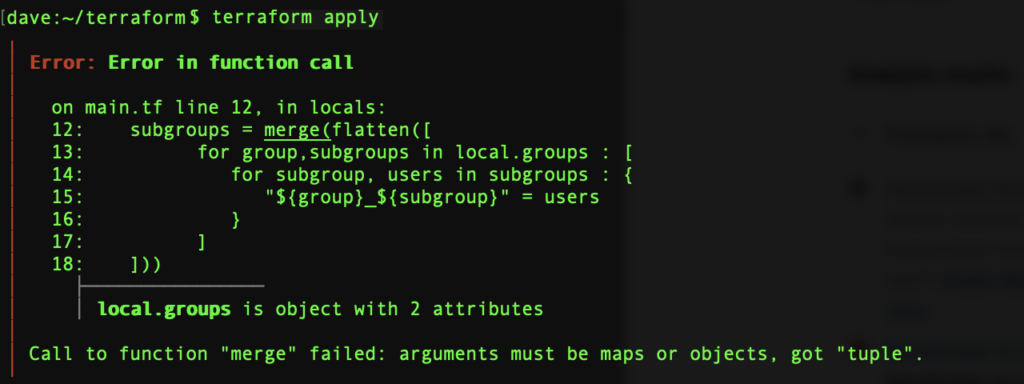
…Or how to avoid the ‘Call to function “merge” failed: arguments must be maps or objects, got “tuple”.’ error message. Maps of maps example.

maps pages papers vintage 1854199


Issue Producing a Single Map


Here’s a typical 2 level data structure that fits users in subgroups, themselves belonging to departments:

locals {
   groups = {
      it = {
         admin   = ["it1","it2"]
         editors = ["it3","it4"]
      },
      accounts = {
         editors = ["account1","account2"]
         viewers = ["account3","account4"]
      }
   }
}


There are good chances you will need to flatten that structure to create some Terraform ressources.
Our target is a map of unique subgroups department_subgroup = [ “user1”, “user2” ]. In our example:

subgroups = {
  "accounts_editors" = [
    "account1",
    "account2",
  ]
  "accounts_viewers" = [
    "account3",
    "account4",
  ]
  "it_admin" = [
    "it1",
    "it2",
  ]
  "it_editors" = [
    "it3",
    "it4",
  ]
}


It is pretty simple to get a list of distinct maps flattening the resulting lists of a double loop:

subgroups = flatten([
   for group,subgroups in local.groups : [
      for subgroup, users in subgroups : {
         "${group}_${subgroup}" = users
      }
   ]
])
# output:
subgroups = [
  {
    "accounts_editors" = [
      "account1",
      "account2",
    ]
  },
  {
    "accounts_viewers" = [
      "account3",
      "account4",
    ]
  },
  {
    "it_admin" = [
      "it1",
      "it2",
    ]
  },
  {
    "it_editors" = [
      "it3",
      "it4",
    ]
  },
]

All we need is merge these maps into a single map but if we do, we end up with:
‘Call to function “merge” failed: arguments must be maps or objects, got “tuple”.’

Call to function "merge" failed: arguments must be maps or objects, got "tuple"
Call to function “merge” failed: arguments must be maps or objects, got “tuple”


2 ways to the rescue: the ugly and the elegant.


The Ugly Way : Another Terraform Loop


The first way you can think of is to process the new map through another for loop. That makes 3 loops and does not make any sense since a simple merge would do the job. Each map has one element only, so we take the first key and first value.

subgroups = { for subgroup in flatten([
   for group,subgroups in local.groups : [
      for subgroup, users in subgroups : {
         "${group}_${subgroup}" = users
      }
   ]
]) : keys(subgroup)[0] => values(subgroup)[0] }


The Elegant Way : Function Expansion


This is much shorter than above solution:

subgroups = merge(flatten([
   for group,subgroups in local.groups : [
      for subgroup, users in subgroups : {
         "${group}_${subgroup}" = users
      }
   ]
])...)

The result is exactly the same but what has changed? Just the 3 dots…
Expansion takes each element out of a list and pass them on to the calling function.


No responses yet

Feb 24 2022

Manage DNS Records with Terraform

Published by under DevOps,Terraform

Terraform helps building infrastructure as code. More and more hosting providers now offer Terraform plugins that let you handle DNS zones. Gandi is one of them along with OVH and many others. Let’s give it a try while version 2 has just ben released, and see how we can push DNS records to Gandi from a Git repository.

DNS with Terraform
21129657 / Pixabay

Gandi Terraform DNS Provider

Gandi Terraform provider has to be declared in a file usually called provider.tf. You can also squeeze in there Gandi API key that’s needed to authenticate and push new resources. It can be generated from their website in “User settings”, “Manage the user account and security settings” under the Security tab.
For obvious security reasons, you’re better off declaring the API key in the GANDI_KEY environment variable instead. I leave it in provider.tf for test purpose.

terraform {
  required_providers {
    gandi = {
      version = "~> 2.0"
      source   = "go-gandi/gandi"
    }
  }
}

provider "gandi" {
  key = "XXXXXXXXXXXXXXXXXXX"
}


DNS Record File

Gandi make automated backup of DNS records in a basic file format, in which I drew inspiration for my DNS record file. Let’s call it domain.txt where “domain” is literally your domain name. Here is a sample file with 3 DNS records.

www1 300 IN A 127.0.0.1
www2 300 IN A 127.0.0.1
www  300 IN CNAME www1


We need to declare the domain as a variable that we’ll use next, in variable.tf.

variable domain {
  default = "mydomain.com"
}


DNS Records Terraform Code

Here’s a minimalist Terraform file main.tf that will read the file with DNS entries, and create a new record from each line.

data "local_file" "dns_file" {
  filename = "./${var.domain}.txt"
}

locals {
  # Convert file to array
  dns_records = toset([ for e in split("\n", data.local_file.dns_file.content) :
                        replace(e, "/\\s+/", " ") if e != "" ])
}
  
resource "gandi_livedns_record" "record" {
  for_each =  local.dns_records
  zone     =  var.domain
  name     =  split(" ",each.value)[0]
  type     =  split(" ",each.value)[3]
  ttl      =  split(" ",each.value)[1]
  values   = [split(" ",each.value)[4]]
}


There you can appreciate the power of Terraform that can do many things in just a few lines of code.

Note that I remove multiple spaces – replace(e, “/\\s+/”, ” “) – when splitting lines because the split function creates empty elements if it finds multiple spaces in a row. I also ignore empty lines. Then we loop throughout each line to create DNS records with a gandi_livedns_record resource type.
This works for A and CNAME records.

We could apply different treatments for each type of records creating separate arrays, or to ignore other types of DNS entries:

dns_records   = [ for e in split("\n", data.local_file.dns_file.content) :
                  replace(e, "/\\s+/", " ") if e != "" ]
A_records     = toset([for e in local.dns_records : e if split(" ",e)[3] == "A"])
CNAME_records = toset([for e in local.dns_records : e if split(" ",e)[3] == "CNAME"])

You could then loop on A_records to create A records, and deal with CNAME in a second resource block.
We could also handle CNAME entries with multiple values, TXT records, etc …


Plan and Apply DNS Records Creation with Terraform

Run terraform plan to check what terraform is going to do. It should say it will create 3 resources. terraform apply will actually create DNS entries.

$ terraform plan

Terraform used the selected providers to generate the following execution plan.
Resource actions are indicated with the following symbols:
  + create

Terraform will perform the following actions:

  # gandi_livedns_record.record["www 300 IN CNAME www1"] will be created
  + resource "gandi_livedns_record" "record" {
      + href   = (known after apply)
      + id     = (known after apply)
      + name   = "www"
      + ttl    = 300
      + type   = "CNAME"
      + values = [
          + "www1",
        ]
      + zone   = "domain.com"
    }

  [...]

Plan: 3 to add, 0 to change, 0 to destroy.


Performance wise, I tried to create 200 entries, and it took 2’57” on a pretty bad connection. Yes, that’s a bit slow since it relies on a REST API call for each one of them. The creation of an additional entry will be fast however.
A terraform plan took 1’31” to refresh these 200 entries.

Indeed, you can always skip the refresh step with terraform plan -refresh=false which takes less than a second.
The plan can be saved into a temporary file, which can be loaded when applying the new changes.

$ terraform plan -refresh=false -out=plan.file
$ terraform apply plan.file
 

No responses yet

Jan 26 2022

Terraform Shared Resources: SSH Keys Case Study

Published by under DevOps,Terraform

Terraform lets you automate infrastructure creation and change in the cloud, what is commonly called infrastructure as code. I need to create a virtual machine, which must embed 3 SSH keys that belong to administrators. I want this Terraform shared resource to be reusable by other modules. This example on IBM Cloud is based on the IBM plugin for Terraform but this method remains valid for other cloud providers indeed.
I did not include the VPC creation, neither subnets and security groups to make it more readable.

Reuse Terraform Shared Resources


Resources in a Single Module

We’ll start with 2 files: ssh.tf containing the code that creates administrator SSH keys, and vm.tf in the same directory, that creates the server. Keys are then given to the VM as input settings.

resource "ibm_is_ssh_key" "user1_sshkey" {
  name       = "user1"
  public_key = "ssh-rsa AAAAB3[...]k+XR=="
}

resource "ibm_is_ssh_key" "user2_sshkey" {
  name       = "user2"
  public_key = "ssh-rsa AAAAB3[...]Zo9R=="
}

resource "ibm_is_ssh_key" "user3_sshkey" {
  name       = "user3"
  public_key = "ssh-rsa AAAAB3[...]67GqV="
}
resource "ibm_is_instance" "server1" {
  name    = "server1"
  image   = var.image
  profile = var.profile
  vpc  = ibm_is_vpc.vpc.id
  zone = var.zone1

  primary_network_interface {
    subnet          = ibm_is_subnet.subnet1.id
    security_groups = [ibm_is_vpc.vpc.default_security_group]
  }

  keys = [
    ibm_is_ssh_key.user1_sshkey.id,
    ibm_is_ssh_key.user2_sshkey.id,
    ibm_is_ssh_key.user3_sshkey.id
  ]
}


The code is pretty simple but raises a major problem:
SSH keys are not reusable in another Terraform module. If we copy/paste that piece of code to create a second VM, an error will throw keys already exist. Also, adding a new key requires to modify the 2 Terraform files.


Terraform Shared Resources

As a consequence, we need to create SSH keys in a brand new independent Terraform module and make them available to other modules. We can achieve this exporting key ids with output values. Outputs make it possible to expose variables to the command line or other Terraform modules.
Let’s move the key declaration to a new Terraform directory to which we’ll add an output ssh_keys that sends back an array with their respective ids, knowing this is what VMs expect as input.

resource "ibm_is_ssh_key" "user1_sshkey" {
  name       = "user1"
  public_key = "ssh-rsa AAAAB3[...]k+XR=="
}

resource "ibm_is_ssh_key" "user2_sshkey" {
  name       = "user2"
  public_key = "ssh-rsa AAAAB3[...]Zo9R=="
}

resource "ibm_is_ssh_key" "user3_sshkey" {
  name       = "user3"
  public_key = "ssh-rsa AAAAB3[...]67GqV="
}

output "ssh_keys" {
  value = [
    ibm_is_ssh_key.user1_sshkey.id,
    ibm_is_ssh_key.user2_sshkey.id,
    ibm_is_ssh_key.user3_sshkey.id
  ]
}


Once you launch terraform apply, you can display output values with terraform output:

$ terraform output
ssh_keys = [
  "r010-3e98b94b-9518-4e11-9ac4-a014120344dc",
  "r010-b271dce5-4744-48c3-9001-a620e99563d9",
  "r010-9358c6ab-0eed-4de7-a4a0-4ba20b2c04c9",
]


This is exactly what we need. All is left to do is get this output through a data lookup and process it in the VM module.

data "terraform_remote_state" "ssh_keys" {
  backend = "local"
  config = {
    path = "../ssh_keys/terraform.tfstate"
  }
}

resource "ibm_is_instance" "server1" {
  name    = "server1"
  image   = var.image
  profile = var.profile

  primary_network_interface {
    subnet          = ibm_is_subnet.subnet1.id
    security_groups = [ibm_is_vpc.vpc.default_security_group]
  }

  vpc  = ibm_is_vpc.vpc.id
  zone = var.zone1
  keys = data.terraform_remote_state.ssh_keys.outputs.ssh_keys
}


That’s better, we are able to handle SSH keys independently of other Terraform modules and reuse them at will. The data lookup path is the relative path to the directory that contains the ssh.tf file.


Variables in Key/Value Maps

That’s better but we could make shared resources (SSH keys in this case) creation more elegant.
Indeed, adding a new key has to be done in 2 different places: create a Terraform resource, and add it to the values returned in the output. Which is tedious and error-prone.
Moreover, it is quite difficult to read, it would be better to separate code and values.

To do this, we are going to store the keys in a map (an array) in a file terraform.tfvars, that is loaded automatically. A file called terraform.tfvars, loads automatically in Terraform. Name it anything else .tfvars

ssh_keys = {
  "user1" = "ssh-rsa AAAAB3[...]k+XR=="
  "user2" = "ssh-rsa AAAAB3[...]Zo9R=="
  "user3" = "ssh-rsa AAAAB3[...]67GqV="
}


In ssh.tf, we’ll loop on that key/value array to create resources, and export them as outputs.

# Array definition
variable "ssh_keys" {
  type = map(string)
}

resource "ibm_is_ssh_key" "keys" {
  for_each = var.ssh_keys
  name = each.key
  public_key = each.value
}

output "ssh_keys" {
  value = values(ibm_is_ssh_key.keys)[*].id
}


Getting values is a bit tricky. I started to display an output values(ibm_is_ssh_key.keys) to analyse the structure and get ids I needed.

In the end, a new shared resource (an SSH key in this case) can be created with a simple insert in a map, witthin a file that only contains variables. In one single place. Anybody can take care of it without reading or understanding the code.


No responses yet

Oct 28 2021

SSL Versions Supported on my JVM

Published by under Java

SSL or TLS supported on a JVM can change depending on many things. Here are the many factors it depends on, and how to display which SSL versions are available and enabled on your JVM.


Factors Affecting SSL Support

SSL support depends first on your JDK version. TLS 1.0 and 1.1 are disabled on more and more JDK distributions by default, while TLS 1.2 is pretty standard. TLS 1.3 is supported on JDK 11 and later and JDK8 builds newer than 8u261.

But you can bypass default settings and disable a TLS algorithm in the Java security property file, just called java.security. SSL / TLS versions can be disabled with the jdk.tls.disabledAlgorithms setting.
There’s actually no way to enable explicitly a TLS version in Java: it has to be supported by the JDK distribution and not be in the disabled algorithm list.

You can always force the use of a TLS version, and cipher, in the java command parameters. Check last section.


Check SSL / TLS Versions Programmatically

Supported and enabled TLS versions can be displayed with a very simple piece of Java code. The getProtocols() method from the SSLContext class will help to display supported SSL versions on your JVM.

import java.util.*;
import javax.net.ssl.SSLContext;

public class tls
{

  public static void main (String[] args) throws Exception
  {
    SSLContext context = SSLContext.getInstance("TLS");
    context.init(null, null, null);
    String[] supportedProtocols = context.getDefaultSSLParameters().getProtocols();
    System.out.println(Arrays.toString(supportedProtocols));
  }

}


Execute the following commands to show the JVM version along enabled and supported SSL protocol versions

java -version
echo "Supported TLS:"
javac tls.java
java tls


Some TLS versions on some servers of mine:

Default OpenJDK
openjdk version "1.8.0_302"
OpenJDK Runtime Environment (build 1.8.0_302-b08)
OpenJDK 64-Bit Server VM (build 25.302-b08, mixed mode)
Supported TLS:
[TLSv1.2]

IBM OpenJ9
openjdk version "1.8.0_242"
OpenJDK Runtime Environment (build 1.8.0_242-b08)
Eclipse OpenJ9 VM (build openj9-0.18.1, JRE 1.8.0 Linux amd64-64-Bit
Compressed References 20200122_511 (JIT enabled, AOT enabled)
OpenJ9   - 51a5857d2
OMR      - 7a1b0239a
JCL      - 8cf8a30581 based on jdk8u242-b08)
Supported TLS:
[TLSv1, TLSv1.1, TLSv1.2]


And TLS versions on a mac:

JVM TLS supported versions

You have now a list of TLS versions enabled on your JVM that you can fully trust.


Check SSL Versions and Ciphers with the Debug Mode

If you want to go further and see what is actually going on, use the Java debug feature. You will get details on disabled SSL protocols, available ciphers, SSL handshake and so on. It is very verbose, you have been warned! But so useful.
Simply launch your java code with java -Djavax.net.debug=all. A simple program that connects to a Mariadb database with JDBC and SSL enabled would be launched with something like:

java -Djavax.net.debug=all \
     -Djavax.net.ssl.trustStore=keystore.jks \
     -Djavax.net.ssl.trustStorePassword=changeit \
     -cp "mariadb-java-client-2.7.3.jar:." myProgram


This will shows a lot of stuff about SSL protocol and ciphers. Some of the lines below:

System property jdk.tls.server.cipherSuites is set to 'null'
Ignoring disabled cipher suite: TLS_DH_anon_WITH_AES_256_CBC_SHA
[...]
update handshake state: client_hello[1]
upcoming handshake states: server_hello[2]
*** ClientHello, TLSv1.2
Cipher Suites: [TLS_DHE_RSA_WITH_AES_128_GCM_SHA256]
[...]
%% Initialized:  [Session-1, TLS_DHE_RSA_WITH_AES_128_GCM_SHA256]
[...]
0000: 01 00 00 01 0A 49 00 00   02 03 64 65 66 12 69 6E  .....I....def.in
0010: 66 6F 72 6D 61 74 69 6F   6E 5F 73 63 68 65 6D 61  formation_schema
0020: 06 54 41 42 4C 45 53 06   54 41 42 4C 45 53 09 54  .TABLES.TABLES.T
0030: 41 42 4C 45 5F 43 41 54   0C 54 41 42 4C 45 5F 53  ABLE_CAT.TABLE_S
0040: 43 48 45 4D 41 0C 2D 00   00 01 00 00 FD 01 00 00  CHEMA.-.........
0050: 00 00 21 00 00 03 03 64   65 66 00 00 00 0B 54 41  ..!....def....TA
0060: 42 4C 45 5F 53 43 48 45   4D 00 0C 3F 00 00 00 00  BLE_SCHEM..?....
[...]

jdk.tls.server.cipherSuites is set to ‘null’ because it was not overridden.
There’s usually a long list of disabled ciphers since they’re linked to disabled TLS protocols for most of them.
Then you see the client hello that shows the TLS version used for the handshake.
Cipher Suites normally displays a long list of available ciphers on the JVM. There’s just one here because I forced it.
Going further down, we can even see SQL queries sent to the Mariadb server during the connection initialisation.
Oracle provides a good documentation on how to debug SSL/TLS going through these messages.


Forcing TLS Versions and Ciphers

It is possible to force the JVM to use some TLS versions and ciphers on the command line. That’s very handy if you don’t have access to the JVM configuration, or if you’d like special settings for a particular Java program.
This can be done with jdk.tls.client.protocols and jdk.tls.client.cipherSuites settings.

java -Djavax.net.debug=all \
     -Djavax.net.ssl.trustStore=keystore.jks \
     -Djavax.net.ssl.trustStorePassword=changeit \
     -Djdk.tls.client.protocols=TLSv1.2 \
     -Djdk.tls.server.cipherSuites="TLS_ECDHE_RSA_WITH_AES_256_CBC_SHA" \
     -cp "mariadb-java-client-2.7.3.jar:." myProgram


TLS protocols and ciphers can also be specified on the JDBC connection string if you use encryption for the database connection.

String url = "jdbc:mariadb://my_database_server:3306/my_database?"+
             "useSSL=true"+
             "&serverTimezone=UTC"+
             "&enabledSslProtocolSuites=TLSv1.2"+
             "&enabledSSLCipherSuites=TLS_ECDHE_RSA_WITH_AES_256_CBC_SHA";
 

No responses yet

Oct 09 2021

Auto Renew LetsEncrypt Certificates on Kubernetes

Published by under Kubernetes

Install cert-manager

Cert-manager comes as a Helm chart with its own custom resources you can install on your Kubernetes cluster. It helps certificates automation, renewal and management. It is a MUST have when you deal with certificate providers who offer APIs that let you automate these processes. On the side, you’d better renew LetsEncrypt certificate automatically since they are valid for a 3 month period.

cert-manager is available on the Jetstack Helm repository, add it to your Helm repository list

helm repo add jetstack https://charts.jetstack.io
helm repo update


Cert-manager runs in its own namespace, so first create it, and install cert-manager helm chart

kubectl create namespace cert-manager
helm install cert-manager \
     --namespace cert-manager jetstack/cert-manager \
     --set installCRDs=true

–set installCRDs=true tells cert-manager to install custom resources such as certificaterequests, certificates or clusterissuers.


LetsEncrypt Cluster issuer

A cluster issuer will contain information about a certificate provider. If you want to get your SSL certificates signed by LetsEncrypt, you will need to apply this yaml file to the Kubernetes cluster:

apiVersion: cert-manager.io/v1
kind: ClusterIssuer
metadata:
  name: letsencrypt-prod
spec:
  acme:
    email: it@company.xxx
    privateKeySecretRef:
      name: letsencrypt-prod
    server: https://acme-v02.api.letsencrypt.org/directory
    solvers:
    - http01:
        ingress:
          class: public-iks-k8s-nginx


LetsEncrypt belongs to the ACME issuers category, meaning it is trusted by most web browsers. It provides a certificate after checking you are the owner of the domain. The check can be done in 2 ways: either a DNS TXT entry or an HTTP challenge. Kubernetes serves HTTP so most people will go for the HTTP01 challenge. This is defined in the solvers section.

The second important piece of information is the class. cert-manager will look at ingresses whose class matches and will provide them with an SSL certificate. IBM Cloud public ingress class annotation is called public-iks-k8s-nginx, so you need to set it in your cluster issuer configuration. Check your ingress to adapt to your own needs.


Ingress Definition

Now that you have a cluster issuer and cert-manager installed, you need to tell them which ingress they should provide certificates to. This is done with ingress annotations.
Simply set the cluster issuer in the cert-manager.io/cluster-issuer annotation.
As seen before, the kubernetes.io/ingress.class annotation is set to public-iks-k8s-nginx on IKS. Set whatever suits your setup.
Add acme.cert-manager.io/http01-edit-in-place wether you want to create a separate ingress for the HTTP challenge or want it to be part of the existing ingress.

apiVersion: networking.k8s.io/v1
kind: Ingress
metadata:
  name: app-ingress
  labels:
    name: app-ingress
  annotations:
    acme.cert-manager.io/http01-edit-in-place: "true"
    cert-manager.io/cluster-issuer: letsencrypt-prod
    kubernetes.io/ingress.class: public-iks-k8s-nginx
spec:
  tls:
  - hosts:
    - www.netexpertise.eu
    secretName: letsencrypt-netexpertise

  rules:
  - host: www.netexpertise.eu
    http:
      paths:
      - path: /
        pathType: Prefix
        backend:
          service:
            name: app-backend-app
            port:
              number: 80


Renew LetsEncrypt Certificate

Cert-manager will create ingress, service and pod in your own namespace that will provide a web page for the HTTP challenge. They will disappear as soon as LetsEncrypt certificate has been renewed and delivered into the secret defined in secretName.

If something goes wrong, you can check the logs of the different pods in the cert-manager namespace, as well as the certificate resource status. A kubectl describe cert should give all necessary information.


No responses yet

Next »