Aug 20 2009
File server cluster on Windows 2003 Server Standard Edition
Most of us already know cluster features aren’t provided on Windows 2003 server Standard Edition.
The thing is you’ve got a shared storage space but you can’t (or don’t want to) afford 2 Windows Enterprise licences just for a file server.
There is DFS indeed but one acknowledge it is a pity to replicate data that resides on a secure storage space.
I suggest here to create a 60 second semi-automatic failover with two 2003 standard edition servers since the cluster feature’s not available. A shared file edited before failing over can be saved after while the user sees no change.
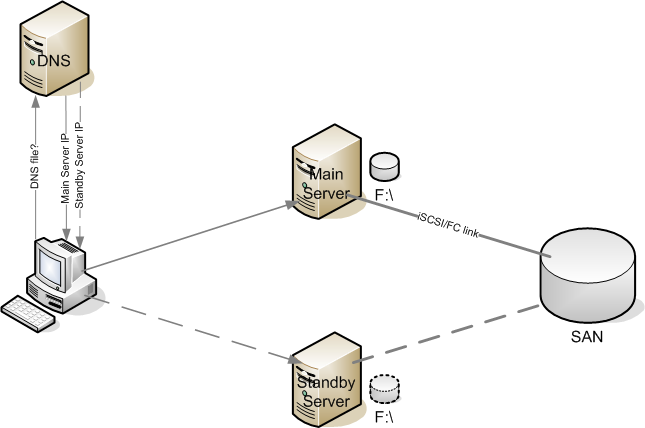
Since we don’t want to modify mount points, scripts, and so on, on workstations, we will not connect to the server IP address nor the hostname but a DNS alias (CNAME) pointing to the main server from a start. To fail over, the alias needs to point to the backup server.
In other words, the XP client (or anything else) makes a DNS query on \\files to which the active server DNS entry is returned. The client is connecting then to the appropriate server.
Share Name
Servers do not accept a share name that is different to the hostname. Accessing the \\files share, an error message is returned.
A workaround is to force the server to accept a different name adding the DWORD value DisableStrictNameChecking in [HKEY_LOCAL_MACHINE\System\CurrentControlSet\Services\LanmanServer\Parameters], and set it to 1 (decimal).
More about this issue at http://support.microsoft.com/kb/281308
You should also add the DWORD value DisableLoopbackCheck in [HKEY_LOCAL_MACHINE\SYSTEM\CurrentControlSet\Control\Lsa] to be able to reach \\files from the server the alias is pointing to. A denied access error is generated if you don’t. See KB926642 for more information.
DNS Cache
XP machines have a DNS cache storing records for a 24 hour default period. This is an issue since the failover is effective one day later for the clients.
The DNS time to live (TTL) setting represents the expiry time in the DNS cache. It can be changed if created with the command line:
dnscmd /RecordAdd mydomain.com files 60 CNAME server1.mydomain.com
60 is important here: the entry – and only this one – will expire after 60 seconds from the DNS cache, time after which the client makes a new DNS request.
Hence, the global cache isn’t touched, since it does the job for other DNS queries, limiting the overall trafic on the network, while the CNAME is quickly updated during the failover procedure.
SAN Configuration
Important: Make the drives visible from the live server only! If you create a LUN to the standby server as well, Windows may corrupt the filesystem even though the disk isn’t mapped to a drive letter.
Since the volume is only visible from the live server, a manual step is required to delete the LUN and create a new one to the standby server. I automated this process with a Perl script that telnets on to the SAN and deletes/recreates LUNs (Most SAN provide telnet access).
Copy Shares Information accross
Shares information is stored in the Windows registry in [HKLM\SYSTEM\CurrentControlSet\Services\lanmanserver\Shares], but on the filesystem. All shares are lost after failing over.
To get them back, shares declared on the main server need to be copied across to the standby server. Only shares located on the drives to be migrated are to be copied. C:\ drive shares for instance aren’t.
Before migrating, we need to make sure drive letters are available on the target server. In order to avoid trouble, we take X: and Y: letters so they aren’t used by removable disks. It is also possible to disable automounting with mountvol.
This DOS script (to run on the main server) copy server’s shares information across on to the standby server. Being a Linux user, I’ve been pretty quickly aware of DOS limitations, widening the code to deal with spaces in share names.
SETLOCAL ENABLEDELAYEDEXPANSION

rem Variables to edit
rem Do not forget RemoveDrives.txt file
set DOMAIN=mydomain.com
rem Standby 2003 server standard edition
set DSTSRV=server2
set DNSSRV=mydnsserver
rem File server DNS alias (without domain)
set CNAME=files
rem Volumes on shared storage to migrate
set DRIVES=X,Y

set KEYPATH=HKLM\SYSTEM\CurrentControlSet\Services\lanmanserver\Shares
set SHARESRC=%KEYPATH%
set SHAREDST=\\%DSTSRV%\%KEYPATH%
set SECURITYSRC=%KEYPATH%\Security
set SECURITYDST=\\%DSTSRV%\%KEYPATH%\Security


rem Check drives are available on target
for /D %%D in (%DRIVES%) DO (
  reg query \\%DSTSRV%\HKLM\SYSTEM\MountedDevices /v \DosDevices\%%D:  2>NUL 1>NUL
  if not !ERRORLEVEL!==1 (
    echo %%D is not available on the target
    echo STOPPING FAILOVER
    goto end
  )
)


rem Delete previous share names on target
for /D %%D in (%DRIVES%) DO (

  rem Go though shares
  for /F "tokens=1 delims=" %%K in ('reg query %SHAREDST%^|findstr %%D:') do (

    rem reg query outputs 3 fields: Value - Type - Data
    rem We swap the type for # since only single characters can delimit
    rem All this needed for share names with white spaces!
    set SHAREKEY=%%K
    set SHAREKEY=!SHAREKEY:REG_MULTI_SZ=#!

    rem Retrieve value (sharename) and data (path)
    for /F "tokens=1,2 delims=#" %%S in ("!SHAREKEY!") do (

      rem Remove leading and trailing whitespace
      rem and adds double quotes for share names containing spaces
      set SHARE=%%S
      set SHARE="!SHARE:~4,-4!"

      rem Remove share names and security
      reg delete %SHAREDST% /v !SHARE! /f
      reg delete %SECURITYDST% /v !SHARE! /f
    )
  )
)


rem Copy shares name and security on to the backup server registry
rem Go though drives
for /D %%D in (%DRIVES%) DO (

  rem Go through shares
  for /F "tokens=1 delims=" %%K in ('reg query %SHARESRC%^|findstr %%D:') do (

    rem reg query outputs 3 fields: Value - Type - Data
    rem We swap the type for # since only single characters can delimit
    rem All this needed for share names with white spaces!
    set SHAREKEY=%%K
    set SHAREKEY=!SHAREKEY:REG_MULTI_SZ=#!

    rem Retrieve value (sharename) and data (path)
    for /F "tokens=1,2 delims=#" %%S in ("!SHAREKEY!") do (

      rem Remove leading and trailing whitespace
      rem and adds double quotes for share names containing spaces
      set SHARE=%%S
      set SHARE="!SHARE:~4,-4!"
      set DATA=%%T
      set DATA="!DATA:~4!"

      rem Restore shares name
      reg add %SHAREDST% /v !SHARE! /t REG_MULTI_SZ /d !DATA! /f

      rem Same method as above for security
      for /F "tokens=1 delims=" %%L in ('reg query %SECURITYSRC% /v !SHARE! ') do (
        set SECURITYKEY=%%L
        set SECURITYKEY=!SECURITYKEY:REG_BINARY    =#!
        for /F "tokens=2 delims=#" %%S in ("!SECURITYKEY!") do (
          REG ADD %SECURITYDST% /v !SHARE! /t REG_BINARY /d %%S /f
        )

      )
    )
  )
)
Two kinds of situation may occur while failing over:
– The primary file server is still online and we want to do some work on it
– The primary file server has crashed and is unavailable
In the second case, Shares information is no more available. This is why it could be judicious to run this piece of script everyday so the standby server is up-to-date as much as possible.
Disconnect the Drives
Failover starts right here. Double-check drives have been removed on My Computer. The partition must NOT be mounted on the 2 servers at the same time! Few actions are required as of now:
– Stop applications accessing volumes
– Remove the drive letter (not the volume :-))
– Modify the DNS
– Restart applications
Only the files to be shared should reside on the volume, not application related. In this scenario, we’d need to stop the related applications during the process.
As a consequence, the ‘file server’ and dependencies are the only services to be stopped: ‘Server’, ‘Net Logon’, ‘Computer browser’ and ‘DFS’. Check if other dependencies were not added afterwards (example: Backup exec in my setup).
All this can be done within a DOS script as well:
rem Stop services beforehands to remove drive letters
net session /delete /y
net stop "Server" /y

rem Remove drive letters
set diskfile=disk.txt
copy NUL %diskfile%
for /D %%D in (%DRIVES%) DO (
  echo select volume %%D: >> %diskfile%
  echo remove >> %diskfile%
)
diskpart /s %diskfile%

rem Change DNS
dnscmd %DNSSRV% /recorddelete %DOMAIN% %CNAME% CNAME /f
dnscmd %DNSSRV% /RecordAdd %DOMAIN% %CNAME% 60 CNAME %DSTSRV%.%DOMAIN%

rem Restart services
rem "Server" service is started with others since they depend on it
net start "Net Logon"
net start "Computer Browser"
net start "Distributed File System"
Target Activation
Before activating the target, recreate the LUNs on your NAS to make the drives visible from the server, either manually or via a script.
Let’s start the service on the backup server. We need to open the disk manager, reassign drive letters and restart the ‘Server’ service and its dependencies. All of this can be done with a DOS script as well. Use the mountvol command to identify drive IDs.
Beware to run a checkdisk to process the NTFS journal since there doesn’t seem to be a way to flush it. It’s fast and you’re sure not to have a corrupted file system at the end of the day. In my setup:
mountvol X: \\?\Volume{3e0cfc97-a6c5-11de-84f1-00237de94c0e}\
chkdsk /F /X X:

rem Restart Share Server
net stop "Server" /y
net start "Net Logon"
net start "Computer Browser"
net start "Distributed File System"
Windows may not detect the disks immediately. Microsoft provide the devcon tool that lets you refresh your hardware. The command line
devcon rescancan be added just before assigning a drive letter with mountvol.
Fail back to the Main Server
Same process but without copying shares in the registry as they’re already in of course.
Netbios Cache
When a user opens a share, the server Netbios name and IP address are added to the Netbios cache table. Entries are stored 10mn in there by default.
Table name content can be displayed with nbtstat command:
C:\>nbtstat -c

Local Network Connection:
Node IpAddress: [192.168.0.10] Scope Id: []

                  NetBIOS Remote Cache Name Table

        Name              Type       Host Address    Life [sec]
    ------------------------------------------------------------
    SERVER2        <20>  UNIQUE          192.168.0.200       595
    SERVER1        <20>  UNIQUE          192.168.0.201       587
If a user opens \\files right before failing over, he’ll have to wait up to 10mn to get back to the share. 2 workarounds:
– Disable the cache adding the DWORD value EnableProxy under the registry key [HKEY_LOCAL_MACHINE\System\CurrentControlSet\Services\Netbt\Parameters], set to 0.
– Decrease the cache timeout from 600 down to 60 seconds. This is where we go, the timeout matches the DNS entry TTL. Edit CacheTimeout under [HKEY_LOCAL_MACHINE\System\CurrentControlSet\Services\Netbt\Parameters]
Replace:
927c0 (600000 in decimal) with
ea60 (60000 in decimal)
That key can be modified on all workstations with GPO (Group Policy).
Disk Write Caching
While dealing with a cluster connecting to a shared storage, you’re better off disabling the disk write caching to get all your data back on the standby server in case the primary server crashes or fails over.
Go in your hardware manager, and clear the Write Cache Enabled check box in the disk properties (labeled Multi-path Disk Device on my server).
Voilà, we’ve got redondancy on a Windows 2003 server standard edition with a failover that takes less than a minute without spending a dime, saving the 4000 bucks for a cluster.
Here are the scripts to disable the main server and enable the backup server. To be renamed with a .bat extension indeed. Scripts to fail back are almost identical. They include a check not to mount the drives on both sides.
Notes:
Do not create shares while on the backup server since the script replicates them from server 1 to server 2, and not the other way around.
Before activating the drives on the target server, make sure the drive letters don’t display in “My computer”.
Hi Dave,
very interesting article!!!
i’m dealing with a similar configuration,
may you insert on the website the perl script too????
i’ve a storage from HP, some suggestion may be needed in changing the units presentation to hosts….. (see step “SAN configuration”!!)
thanks
PS: I’m available to send you my scripts also, just to compare the work we’ve done….
regards,
francesco
Hi Francesco,
I sent the script on to you in a private mail