Mar 06 2021

Why Ansible Upgrades Packages on Hold and How to Fix it

Published by under Ansible

I was writing a new Ansible role to upgrade all of my VMs with apt update and apt upgrade. I was still using an old Rancher that only works with docker-ce package up to version 18.06.

A first task holds back the package with Ansible Dpkg module, basically an apt hold, as recommended on many websites.
A second and third steps run an apt update and apt full upgrade on my system with Ansible apt module.

- name: keep docker from being updated on Rancher nodes
  dpkg_selections:
    name: docker-ce
    selection: hold
- name: apt update cache
  apt:
    update_cache: yes
  changed_when: False

- name: apt full-upgrade
  apt:
    upgrade: full


I then launch my playbook full of confidence and, see docker-ce being upgraded! Oddly, this seems to impact Ubuntu distributions, while it runs smoothly on Debian family.

Moto Cross Sport Race Vehicle
Vitrioline / Pixabay


The Ansible apt module page states “If full, performs an aptitude full-upgrade”.
Let’s check the package on hold after the first step:

$ dpkg -l | grep docker
hi  docker-ce   18.06.3~ce~3-0~ubuntu.  amd64.  Docker: the open-source application container engine


Same with aptitude:

$ aptitude search ~i | grep docker
i  docker-ce - Docker: the open-source application container engine

h for hold is MISSING!


apt-get and aptitude seem to rely on different hold functions, thus “dpkg –selections” doesn’t assure that aptitude (which is the command that performs the upgrade) will not touch the held packages.


What now?
We’re lucky, Ansible apt module provides a way to force updating with apt-get instead of aptitude

- name: apt full-upgrade
  apt:
    upgrade: full
    force_apt_get: yes

And it did solve my problem


No responses yet

Feb 28 2021

Change Procedure/Function Security Type and DEFINER

Published by under Mysql

Mysql procedures and functions security type is set as DEFINER which is the default value, as described in the “Create Procedure and create function chapter” on mysql.com.
Why one needs to be cautious? Anyone with EXECUTE privilege can run the procedure or function with the DEFINER permissions. This might not be what you want.

An error may be raised when someone tries to run the procedure/function which definer has been deleted
ERROR 1449 (HY000): The user specified as a definer (‘definer’@’localhost’) does not exist
As a result, you may have to change definer and/or security type on a lot of procedures and functions at once.
It is interesting to note that a missing user doesn’t bother Mysql while dumping and restoring unlike views that raise an error.


First off, you can have a quick glance at your procedures and functions with the 2 basic:

SHOW FUNCTION STATUS;
SHOW PROCEDURE STATUS;

You may add a LIKE ‘my_proc’, or WHERE Db LIKE ‘my_database’ for filtering out results


Now, it is always possible to change definers and security type with Mysql Workbench, or recreating them in SQL but your best bet is to change them all at once in command line (narrow update using the WHERE clause to apply to some):

UPDATE mysql.proc SET security_type='INVOKER'
WHERE security_type='DEFINER';


You can also update DEFINER as well with the following query:

UPDATE mysql.proc SET definer='root@localhost'
WHERE NOT definer='root@localhost';
 

No responses yet

Jul 04 2020

Register a Jenkins Slave with Ansible

Published by under Ansible,Jenkins

We saw how to register a Jenkins slave with a REST API. Let’s go one step further: make Ansible do that for you.

You will first need a Jenkins user and associated token with the proper rights. Agent connect and create permissions should be sufficient. I’ll simply call that user “node”. Log on Jenkins with the “node” account and add a new token.

Cafe Morning Coffee Drink Drinking  - 453169 / Pixabay
453169 / Pixabay


The new node details need to be passed on to the REST url. We’ll squeeze these settings into a Jinja2 template as follow:

{
   "name": "{{ jenkins_node }}",
   "nodeDescription": "slave {{ jenkins_node }}",
   "numExecutors": "{{ jenkins_numExecutors }}",
   "remoteFS": "{{ jenkins_remoteFS }}",
   "labelString": "{{ jenkins_label }}",
   "mode": "EXCLUSIVE",
   "": [
      "hudson.slaves.JNLPLauncher",
      "hudson.slaves.RetentionStrategy$Always"
   ],
   "launcher": {
      "stapler-class": "hudson.slaves.JNLPLauncher",
      "$class": "hudson.slaves.JNLPLauncher",
      "workDirSettings": {
         "disabled": true,
         "workDirPath": "",
         "internalDir": "remoting",
         "failIfWorkDirIsMissing": false
      },
      "tunnel": "",
      "vmargs": ""
   },
   "retentionStrategy": {
      "stapler-class": "hudson.slaves.RetentionStrategy$Always",
      "$class": "hudson.slaves.RetentionStrategy$Always"
   },
   "nodeProperties": {
      "stapler-class-bag": "true",
      "hudson-slaves-EnvironmentVariablesNodeProperty": {
         "env": [
            {
               "key": "JAVA_HOME",
               "value": "{{ java_home }}"
            }
         ]
      },
      "_comment:": {
         "hudson-tools-ToolLocationNodeProperty": {
           "locations": [
               {
                  "key": "hudson.model.JDK$DescriptorImpl@JAVA-8",
                  "home": "/usr/bin/java"
               }
            ]
         }
      }
   }
}


Adapt the template to your needs, if you’d like a SSH agent for instance.

The variables that will be replaced in the template can be defined in the following “default” file:

jenkins_slave_user: jenkins-slave
jenkins_token: xxxxxxde2152xxxxxxaa339exxxxxx48d6
jenkins_user: node
jenkins_url: https://jenkins.domain.lan
jenkins_node: "{{ansible_hostname}}"
jenkins_numExecutors: 4
jenkins_remoteFS: /home/jenkins-slave
jenkins_label: "label_1 label_2 label_3"
java_home: /usr/lib/jvm/java-8-openjdk-amd64/


jenkins_user will connect to the master and create the new node, authenticating with jenkins_token created beforehand.
jenkins_slave_user is the system user that will launch Jenkins service on the node.

We can now add Ansible tasks to build our role. We first call the REST API:

 name: create node on Jenkins master
 uri:
 url: "{{jenkins_url}}/computer/doCreateItem?name={{ jenkins_node }}&type=hudson.slaves.DumbSlave"
 method: POST
 body_format: form-urlencoded
 force_basic_auth: yes
 user: "{{ jenkins_user }}"
 password: "{{jenkins_token }}"
 body: "json={{ lookup('template', 'node.json.j2', convert_data=False) }}"
 return_content: yes
 status_code: 200, 302, 400
 register: webpage


I added return code 400 in case the node already exists but you may remove it if you think it’s best. Then I make it fail if the error is anything else than ‘already exists’:

 name: Go through if agent already exists error
 fail:
 when: >
       webpage.status == '400'
       and 'already exists' not in webpage.x_error 


The Jenkins agent service needs a secret from the master to get started. The secret is embedded in the agent’s page in XML format so you can easily retrieve it.

 name: get node page content
 uri:
 url: "{{jenkins_url}}/computer/{{jenkins_node}}/slave-agent.jnlp"
 method: POST
 body_format: form-urlencoded
 force_basic_auth: yes
 user: "{{ jenkins_user }}"
 password: "{{ jenkins_token }}"
 return_content: yes
 status_code: 200
 register: slavepage
 name: get secret from xml
 xml:
 xmlstring: "{{slavepage.content}}"
 xpath: /jnlp/application-desc/argument
 content: text
 register: secretxml 

It will be stored in the system user’s default file /etc/default/jenkins-slave that is loaded by the startup script.

Here’s the template:

JENKINS_USER="jenkins-slave"
JENKINS_WORKDIR=$(eval echo "~$JENKINS_USER")
JENKINS_URL={{ jenkins_url }}
JENKINS_NODENAME=$(hostname)
JENKINS_SECRET={{ jenkins_secret }}
JAVA_ARGS="-Xmx6g"


Here comes the init script. We can now upload these two files:

 name: Copy jenkins-slave default file template
 template:
 src: jenkins-slave-default.j2
 dest: /etc/default/jenkins-slave
 owner: jenkins-slave
 group: jenkins-slave
 mode: 0600
 vars:
 jenkins_secret: "{{secretxml.matches[0].argument}}"
 register: jenkins_config
 name: Copy jenkins-slave init file
 copy:
 src: jenkins-slave-init
 dest: /etc/init.d/jenkins-slave
 owner: root
 group: root
 mode: 0755


Final step, we make sure the service is started:

 name: restart and enable jenkins-slave service if needed
 service:
 name: jenkins-slave
 enabled: yes
 state: restarted
 when: jenkins_config.changed
 name: start and enable jenkins-slave service
 service:
 name: jenkins-slave
 enabled: yes
 state: started 


These steps were the basics but you can do a lot more like adding the Jenkins system user creation, adding your own CA certificate if you’re on a private IP, and so on

Also check how to speed up Ansible and save a lot of time when deploying.


No responses yet

Apr 18 2020

Auto Register a Jenkins Slave with REST API

Published by under Jenkins

Here is how to create a Jenkins node that registers automatically with a REST API call on the master. Most of the work is to build some json code that describes the new Jenkins slave. The configuration can be slightly different depending on the node settings you are willing to apply. To get exactly what you want, you may create a dummy slave manually and capture the JSON object in your browser developer tool’s network tab while you click on “Save”. In the meantime, here is mine, assuming agent launches with a startup script:

{
   "name": "my_jenkins_slave",
   "nodeDescription": "my Jenkins slave",
   "numExecutors": "2",
   "remoteFS": "/home/jenkins",
   "labelString": "slave",
   "mode": "EXCLUSIVE",
   "": [
      "hudson.slaves.JNLPLauncher",
      "hudson.slaves.RetentionStrategy$Always"
   ],
   "launcher": {
      "stapler-class": "hudson.slaves.JNLPLauncher",
      "$class": "hudson.slaves.JNLPLauncher",
      "workDirSettings": {
         "disabled": true,
         "workDirPath": "",
         "internalDir": "remoting",
         "failIfWorkDirIsMissing": false
      },
      "tunnel": "",
      "vmargs": ""
   },
   "retentionStrategy": {
      "stapler-class": "hudson.slaves.RetentionStrategy$Always",
      "$class": "hudson.slaves.RetentionStrategy$Always"
   },
   "nodeProperties": {
      "stapler-class-bag": "true",
      "hudson-slaves-EnvironmentVariablesNodeProperty": {
         "env": [
            {
               "key": "JAVA_HOME",
               "value": "/usr/lib/jvm/java-8-openjdk-amd64"
            }
         ]
      },
      "_comment:": {
         "hudson-tools-ToolLocationNodeProperty": {
           "locations": [
               {
                  "key": "hudson.model.JDK$DescriptorImpl@JAVA-8",
                  "home": "/usr/bin/java"
               }
            ]
         }
      }
   }
}


All you need is define the 3 following environment variables in the shell:

jenkins_user=my_jenkins_user
jenkins_token=my_jenkins_token
jenkins_url=https://jenkins.mydomain.lan


And post above JSON file with a simple curl:

$ curl -L -s -o /dev/null -w "%{http_code}" -u $jenkins_user:$jenkins_token \
-H "Content-Type:application/x-www-form-urlencoded" -X POST \
-d "json=$(cat /tmp/node.json)" \
"$jenkins_url/computer/doCreateItem?name=my_jenkins_slave&type=hudson.slaves.DumbSlave"; \
echo
200


If you do not get a 200 response code, run the same skipping “-o /dev/null” to troubleshoot.
Some say you may do the same with different tools like Jenkins CLI or some plugins but Jenkins REST API works through any firewall and is pretty easy to set up.
In the next post, I’ll use this method to automate Jenkins agent registration with Ansible


No responses yet

May 17 2018

Browser Driver has Received Too many Illegal Datagrams

Published by under AS400

I was getting tons of events ID 8016 labelled “bowser” in the Windows system event log. These might be generated by IBM i (AS400) servers:
 
“The browser driver has received too many illegal datagrams from the remote computer AS400 to name DOMAIN on transport NetBT_Tcpip_{356179F8-4CA4-48CA-92C2-AFEA87D1F884}. The data is the datagram. No more events will be generated until the reset frequency has expired.”
 
Here’s how to get rid of them:
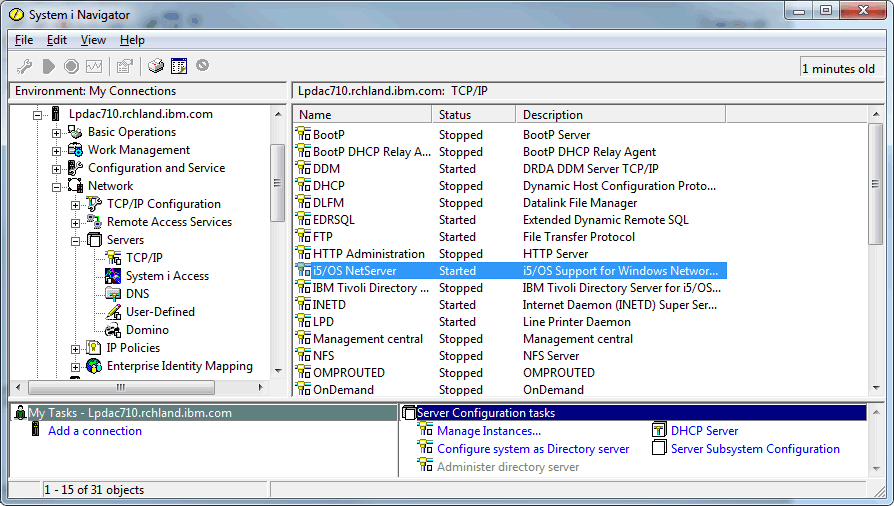
Open System i Navigator or Navigator for i
Browse Network, Servers, TCP/IP Servers
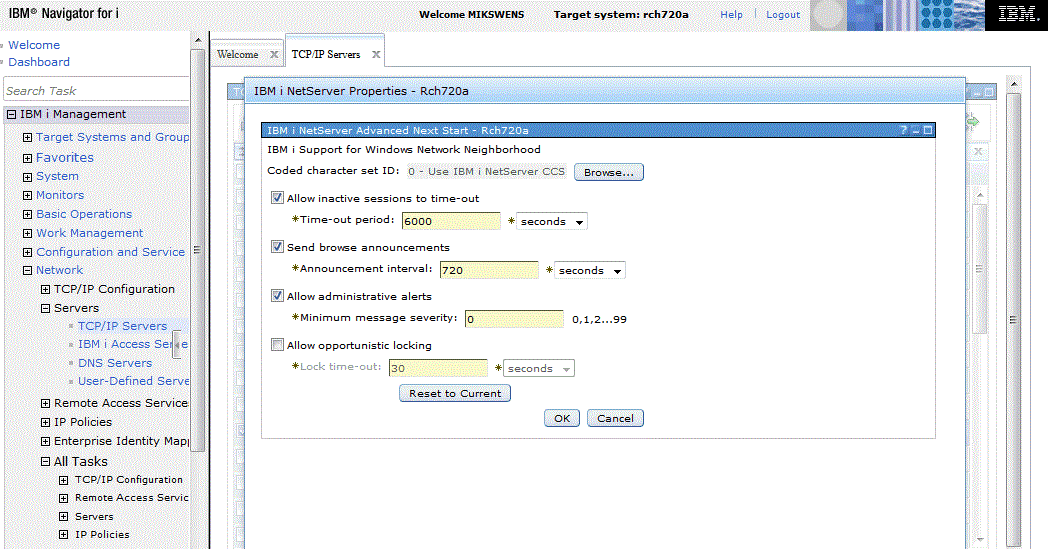
Select IBM i NetServer, clic on the Actions tab and select Properties


In the new window, go into the Advanced tab, click on “Next Start”
and untick “Send browse announcements”


You should receive no more illegal datagrams error messages from now on.


No responses yet

« Prev - Next »